This may seem like a fairly obvious question, but seeing as how you have found this guide on how to change sewing machine needles, it must not be that straightforward of a thing. In fact, lots of people who are professional at hand sewing do not know how to change the needle on a sewing machine. It is complicated, just look at all the confusing mechanics!
Whether you are a novice seamstress or tailor, if it is your first time using a sewing machine, or if you are even just wondering if you change your sewing machine often enough, this guide will help you.
What is a Sewing Machine Needle?
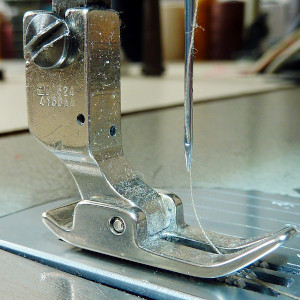
 The needle of your sewing machine is the most important part of the machine, arguably. It is connected to the inner workings via a system of belts and driveshafts, and it is powered by the main motor. The needle of your sewing machine is what punctures the fabric to create the stitches while sewing. The exact mechanics are quite complicated, but basically you cannot sew without a needle. It would be like driving without wheels.
You may have heard the term “stitches per minute” before, and this relates to how many times your needle punctures the fabric to make a stitch. This is a critical thing to know when shopping for a sewing machine, as you can get models that offer anything from 100 stitches per minute to 2000 stitches per minute.
Why Change a Sewing Machine Needle?
There are multiple reasons why you may be in a position to change your sewing machine needle. Perhaps you have been using the machine for a long time and have yet to change the needle even once. Then again, maybe your needle has grown dull and is no longer puncturing the fabric as easily as it should be.
By adding a fresh needle to your machine, you will be improving the overall quality of your stitches while making your projects look even better than before. A fresh needle is key to continue sewing at maximum efficiency.
How Often Should I change My Needle?
There is a lot of debate around how often you should be changing your sewing needle. The truth is that it should be done fairly regularly. The number one reason for problems while sewing is because your needle has not been replaced.
Needles get dull extremely quickly. This is especially true if you are using your sewing machine often. Needles bend and tug as they perforate fabrics, and they can even be nicked when sewing over something tougher. By the time your needle is compromised, your stitching is already suffering.
To mend this issue, take good care and constantly change your needle. This does not mean every day. But it is highly recommended that you use a new needle each time you start a new project. Alternatively, try changing your needle every time you start sewing a new material.
For example, if you have been sewing fleece, but move on to leather or denim, you may want to change to a different needle that is better suited to that fabric. If you do not change your needle, you can end up with broken threads, uneven stitches, and even damaged fabrics. Obviously, this is not ideal.
How to Change My Sewing Machine Needle
Keep in mind that almost every sewing machine is going to come with a manual that has instructions for replacing the needle on that particular machine. And while most machines are going to work identically, rare machines may require some different approach.
The following steps are how to change a sewing machine needle on your standard machine.
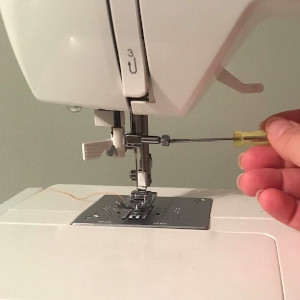
 Step 1: First you want to unscrew the screw at the top of your needle. Hold the needle with your left hand and unscrew it with your right. If you don’t hold the needle, it may fall inside of your machine. Most sewing machines come with an included tool or a special screwdriver for unscrewing this piece.
Step 2: Remove the needle. Pull the needle down and away from its clamp. You can now safely dispose of this worn-out needle.
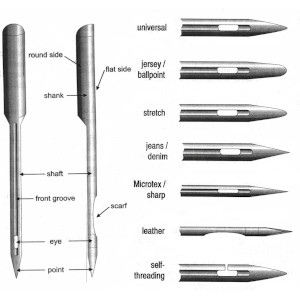
Step 3: Insert the new needle. You want to insert the new needle with its flat edge facing the rear of the sewing machine. You will also notice a groove on the back of the needle’s point, which will face the same direction as the flattened top part.
You need to push the needle upwards into the needle clamp until it will go no further. Push up until the needle bottoms out.
Step 4: Tighten the clamp screw with your right hand while holding the needle in place with your left hand. Once the screw is tight, you may let go of the needle and tighten the screw better with the screwdriver or the tool. Make sure the clamp is very tight before you finish, otherwise you will have some serious problems when you start sewing.
Step 5: Now you must rethread your needle. Many machines now come with an automatic threader that will do this for you. If you are doing it by hand, make sure you push the thread from the front to the back.
Once your needle is threaded, you are ready to keep on sewing.
How to Change Sewing Machine Needle: Final Thoughts
 Congratulations, you are now able to change your sewing machine needle all by yourself. See, I told you it was not that hard!
Keep in mind that different needles are going to be available for different sewing machines, and different needles are going to be better suited to different fabrics. There are a lot of needles to choose from, but all are particular for a certain job.
When shopping at your local hobby store, you will see assorted batches of stretch needles, quilting needles, leather needles, and plain old universal needles. By using the correct needle for the job, you will maintain the life of the needle for longer, meaning you won’t need to change as much. This whole process should take no longer than two or three minutes to complete. It is as easy as changing a lightbulb.


