The course of action followed by a tailor of combining multiple layers of cloth is known as quilting. It can be both manually as well as mechanically. Manually refers to sewing by hand with needle and thread, though takes a long time—however, quilting with the use of a sewing machine which is much easier and faster too.
The Art Of Quilting
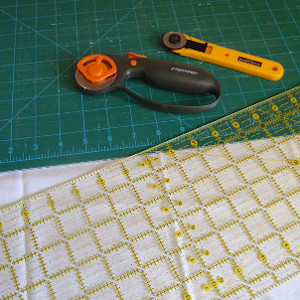
 The significant process of quilting includes a batch of stitches that pierces through all the layers (minimum of three) for providing a surface of three dimensions. But another critical step while quilting is cutting the fabrics with accurate measurements that they fit in absolutely perfect. A quilting ruler is an essential requirement for precise measurements. Using regular scissors and a ruler is harsh for this task.
For mastering the art of quilting, it is first essential to know the basics of how to use a quilting ruler. The usage is quite easy, but one must figure out the craft of using a quilting ruler. A quilting ruler has the ideal measurement printed on it. They are in a grid-like form, which helps in cutting the fabric according to the required size. These rulers are available in varieties of shapes and sizes, but the basic pattern for all of them is the same. The markings may look a bit confusing to the beginners in the department of quilting. However, any of the types will become more comfortable to use in due course of time and regular practice.
Markings In A Quilting Ruler
Below are few points as per the markings on a simple quilting ruler. Understanding the various markings on the ruler is the simplest way to follow the procedure of how to use a quilting ruler.
Stage 1- Width: Note the width of the ruler. Please put it on the fabric and mark it on the measurement printed on the ruler. For instance, for two-inch cuts, point on the second-longest line and cut through it.
Stage 2- Inch Markings: For patterns on the quilt, with specific measurement of say three and three-eighths, use the hatch marks on the quilting ruler. Four values of prints are available on every one-inch marking. The marking of the half-inch is longest followed by the quarter and then by the eight-inch ones. For the said pattern of three-inch, mark on the opposite side of half-inch value. It is because no work will happen on this side of the half-inch. Then count and cut.
Stage 3-Angle Markings: For different shapes and patterns, angle marking prints are on the quilting ruler. Set the ruler to an angle as per requirement and cut across it. While cutting the fabrics of the corners of the quilt, there is the need for intersecting angles such as 30 degrees, 45 degrees, and 60 degrees in most current projects.
Stage 4- Diagonal Marking: Notice the diagonal line on the ruler. This diagonal mark helps in searching the values while marking for different patterns and shapes.
Process Of Using A Quilting Ruler
 The most straightforward method of using a primary quilting ruler is in the step-by-step process as follows:
Step 1: Find the required marking on the ruler be it in inches or degrees and point it with a temporary marker or a sticky note.
Step 2: Align up the angle with that of the edge of the fabric.
Step 3: Turn the straight part to the end of the fabric and make your initial cut as per the measurement.
Step 4: Next, keep the angle on the straight edge of the fabric and align the initial one with that of the measurements.
Step 5: Turn the ruler to the width of the strip and make the cut.
With the markings of a quilting ruler above, it is also essential to know the properties of different types of quilting rulers available, for a better understanding of the art. Some are as follows:
The Basic Ruler: They are non-slippery with grid markings which help in measuring. This kind helps in proper alignment while cutting the fabric. They have clear markings easier to spot the values and each mark with anti-slipping property for a firm grip. As per needs, you can choose from different squared and rectangular sizes, each with varying sizes of the grid.
The Angled Ruler: For hexagonal projects, these rulers are of best use as they have angular markings on them. Cutting fabric pieces become a lot easier with this type of quilting ruler. Following the marked angles properly will ensure accurately fitting pieces.
The Squared Ruler: They are in the form of a triangular square and half square. For preparing a quilt with perfect squares, use this kind of quilting ruler. For getting the perfect right angles and making the work of cutting the exact sizes of fabric, this ruler is a must.
The Pyramid Ruler: Also known as the Dresden ruler, have a pyramidal triangular shape with more extended heights but short bases. If the quilting project requires innovative forms like wheels, use this type.
The Curved Ruler: For projects other than squared quilts, like round-shaped cutting a perfect curved patch of fabric is required. The curved rulers with different measurements and templates shall help you with the same.
How To Use A Quilting Ruler: Final Thoughts
 For creative quilting projects, one must have explicit knowledge of how to use the different types of rulers for various angles and shapes. Although the basic technique is the same, incorporating the minute details on a quilt needs a thorough understanding of the usage of different kinds of quilting rulers. For beginners in the field of quilting, one must own a clear and standard ruler.
It can be used for cutting strips for a new project, trim an existing one and also for slicing large patches of fabric. As a suggestion, an amateur can use the 6’’ x 24’’ quilting ruler to set hands and to have a thorough study on the basics of quilting. Next time you plan to take up a quilting project, use a quilting ruler to make the whole measurement process more accessible and convenient.

