
 What does it mean to end a stitch? Basically, you start sewing, you keep sewing, pushing the needle in and out, and then you get to the end… now what? You need a reliable way to end your stitch. This means you need a way to secure your stitch when it’s finished so that your thread does not get loose or fall out.
How you end your stitch is going to depend on what you’re doing, hand stitching or sewing using a machine. There is a proven method for each one, and obviously they are both different. While hand stitching only involves one smooth movement at the end, machine sewing involves a quick maneuver with your machine.
Let’s breakdown the two methods of ending your stitch so that you can become a better and more efficient practitioner of the thread. Whoever said learning couldn’t be hands-on?
How to End a Hand Stitch
If you’re sewing by hand, you will eventually reach the end of the fabric and will need to end your stitch. To do this, it is extremely simple. Even a monkey can do it! All you must do is make a simple loop into the final stitch you just made, draw your needle through it, pull tightly to make a knot that will securely fasten the stitch in place, then cut.
Did I lose you? No problem. Let’s take it step by step so that you understand exactly how to do it.
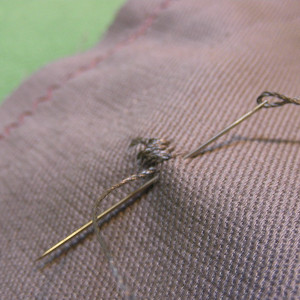
Step One: Turn the Fabric
Once you get to the end, you want to flip the fabric over to look at the underside where all the stitches are visible. From here you will be able to see the exact length of your stitches and where exactly you need to end.
As a precaution, you want to have at least 6 inches of loose thread left on your needle by the time you reach this point. This will allow you to properly secure the last stitch without fighting with the thread or losing the thread. With your fabric flipped the wrong side up, proceed to step two.
Step Two: Make the Loop
With your needle and thread loose, you want to go back underneath the last stitch that you made. This means going from underneath and pulling the needle up through the final stitch. You will need to pull on the needle until you have a small U-shaped loop that is roughly 1-inch wide.
If you do not have enough thread left on your needle, you may have a hard time making the loop. If this is the case, you want to tie additional thread onto the end of the thread that is already on your needle. Do this, then you may slide the needle onto the now-extended thread to give you enough leeway.
Step Three: Make a Knot
Now it is time to make the knot. Insert the needle and thread through the U-shaped loop you just made and pull it tight. This will create a very sturdy knot. You may need to pull the thread hard up and down, then side to side for it to close into the sturdiest possible knot.
When you pull the thread upward, you will be able to see three small threads positioned at the base of your new knot. This means you did it right.
Step Four: Double Knot
 This is where things get crazy. You want to double knot the stitch to ensure it never goes anywhere. To do this, you need to bring your needle downwards underneath the same stitch to make a full circular loop. With your loop made, bring your needle through and then pull tightly to make an additional knot.
This is a critical step if you have extremely thick fabric or if you are unsure of how stable your stitches really are. You also should remember that none of the knots will be visible from the front-facing side of the fabric.
Step Five: Trim
The final step is to trim whatever thread is left hanging loose, then turn your fabric over. You must take a pair of sharp scissors and then cut very close to the knots you just created. This will keep any excess threads from flopping around.
It is OK if a little bit of thread still sticks out. It is also OK if you cut very close to the knot because as long as the knot is tight the stitches will remain in place.
How to End a Stitch on a Sewing Machine
If you thought ending your stitch when hand sewing was easy, you will be pleased to find out that ending a stitch on a sewing machine is even easier. Just follow these steps.
Step One: Stop
Continue stitching your fabric until roughly 3/4 of an inch from the edge of the fabric. It does not matter if you are using a straight stitch or a zigzag stitch. Just stop when you are near the end.
If this is your first time sewing, you may want to practice ending your stitch on a loose piece of cloth or fabric.
 Step Two: Reverse
Chances are your sewing machine has a reverse button. Find it and switch the machine into reverse. It is either a button, a switch, or even a dial. It is important to understand how to activate reverse in your machine before starting, otherwise, you may stitch all the way off the fabric by accident.
Step Three: Backstitch
With your sewing machine now sewing in reverse, make about 5 backstitches. If you are in reverse, the machine will stitch directly over top of the last stitches that you just made. You have now secured your stitches by reversing over them with an extra layer of thread.
For an even stronger and more secure end stitch, you can adjust the length of your stitch to make them shorter and less likely to unravel.
Step Four: Forward & Cut
All you need to do is forward stitch to the end of the fabric after switching out of reverse mode. This effectively makes three layers of overlapping stitching at the end of your fabric. Now you can cut the excess thread as close as possible to the fabric. I guarantee your stitches are not falling out anytime soon.
