A house with babies often stocks up soft and cute quilts. Do you wish to sew a quilt for your little one? It will not require many materials as even scrap fabrics work fine for a baby quilt. It can seem daunting to choose the right materials and tools to get things done faster. Do not worry! Just gather your sewing machine, the essential items, and follow these simple steps to create a lovely quilt for your baby. I will break down the steps to simplify the process.
Step 1: Make The Block Pattern
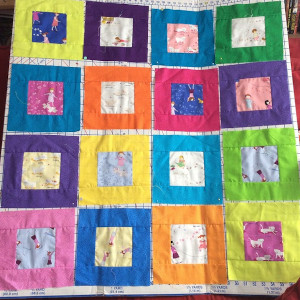
 Take any fabric you wish to make a quilt from. Cut them into 5-inch squares using a rotary cutter. Another option is to buy a charm pack of your choice in case you are falling short of time. (A charm pack is a set of fabrics precut into 5-inch sizes for quilting purposes.) You will require 42 such squares for this project.
About 1 yard of soft fabric will be required for making the bottom side of the baby quilt. Once all the squares are ready, assemble them into the desired pattern to make 6 by 7 rows for the quilt.
Take one row at a time and sew it all together, placing side by side. Iron the rows before you sew them. It is advisable to press the seams in opposite directions. This means if the seams of row one were pressed to the left, press the seams for row two to the right.
When this is done, it is easier to match corners easily while sewing. Consider ¼ inch seam while sewing. Once you are done with one row, continue the same with other rows too. So, now you will have 7 rows.
The thing to do is, sewing all those rows together, one below the other. Gently press the rows before beginning to stitch them together.
For perfect stitching, make sure to match all seams from top to bottom. Just use pins to attach row 1 to row 2, row 2 to row 3, and so on by putting the right sides together. While doing so, give attention to keep the seam from each row matching with the next one.
Continue to stitch all rows one below the other to get a full blanket top. Press the whole blanket again.
Step 2: Basting The Quilt
Basting is a process by which the three layers; the quilt top, the batting; the quilt backing fabric, are held together temporarily.
You will need the following things to baste the quilt:
- A quilt backing fabric (a soft fabric) about 5” wider than the top blanket on all sides.
- Quilt Batting
- A large flat and area to do the basting.
- Iron
Begin by smoothening all the three layers to get rid of any wrinkles. Now, iron the quilt backing fabric and stick it on the floor with strong adhesive tape.
Lay the quilt top over the batting fabric and press both layers to remove wrinkles. This makes the top stick to the batting slightly. Once you are certain that both the layers are perfectly flat, roll them together.
Now the real work is to make these three layers stick together while quilting. Various methods can make this happen. You can choose one of these methods.
Pin Basting
 This is one of the most common methods of creating a quilt sandwich. You have to get ready with a huge collection of pins. Carefully, place pins to keep the layers in place. Though pin-basting is time-consuming and needs patience, it is a fail-proof method for quilts of all sizes. Place a pin at least every four inches all over the quilt.
Using curved basting pins of 1 ½” size will be beneficial to prevent making large holes in the quilt. Regular pins are not sharp enough to hold three layers of the quilt sandwich. How do you know whether the pins are enough? Just put your hand over the quilt, if you do not touch any pins, you need to put more of them.
Spray Basting
If you are not comfortable with pin basting, you can go for the spray basting technique. This method uses an adhesive spray to stick the layers of the quilt together until you are done quilting. The process is quite simple, spray the adhesive on the wrong side of the back fabric and the quilt top. Spray basting is a faster and hassle-free method compared to pin basting.
Use the spray in a well-ventilated area only. It is not recommended for use by pregnant ladies. While buying the spray, ensure there is a “temporary” label on it so it can be washed away later.
Step 3: Quilting
The third step is to quilt the sandwich layers together. Each sewer has his/her own way of doing this step. You can do free-motion quilting, which will help the fabric be moved under the needle as per your preferred pattern. This technique requires a little practice because there is no marking on the quilt and you are manually moving the fabric under the needle.
The good thing about creating a baby quilt is that the size is easier to handle. Just stitch throughout the quilt without pulling the fabric just taught it. You can carry out hand quilting too.
Step 4: Binding
Bind the edges of the quilt by double folding it and hand-sewing the binding. You can go ahead and put a date on the binding or the name of the baby for whom you made it. It will definitely bring fond memories in the future. Enjoy the wonderful creation!
How To Make A Baby Quilt: Final Thoughts
It certainly requires a lot of effort and patience in making the perfect baby quilt. The more you stitch over the quilt sandwich, the longer it will last. You can add your own creative ideas to make the final quilt look more appealing. You can choose any preferred design and pattern as per your liking. I hope this guide was useful for your next baby quilt project.

