While learning the basics of sewing, one essential lesson is, knowing how to sew a tube of fabric. In simple words, it means the process of stitching fabrics in the form of a hollow tube-like structure like that of sleeves or pants. This technique is a free arm and also requires a machine with one. One must understand the basic features and parts of a simple sewing machine before knowing a free arm sewing machine.
What is a Free Arm Sewing Machine: Structure and Location
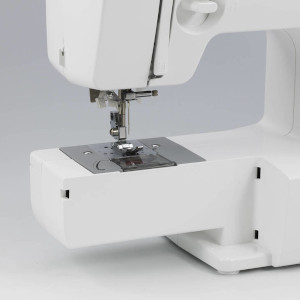
 A free arm sewing machine has a personalized design where the removal of the total bases exposes the free arm portion. Almost all sewing devices have a free arm attached to it, mostly the portable ones. The elongated object standing out from below the main structure of the machine is the free arm. It passes the needle and the feed dogs.
In some machines, the free arm’s location is available with the removal of the supply box attached to the device. Whenever there is a requirement of using the free arm, please take out the toolbox and put it back again after completion of the work. It is that simple.
(Note: The toolbox serves two functions. One is storing the materials required during work and keeping in reach. Secondly, it is useful as a free arm by attaching it to the machine)
In case you are not able to figure out, you already have the user manual that accompanies every machine on purchasing. You can use it at any time.
How To Use A Free-Arm Sewing Machine
After learning what is a free arm sewing machine, let us understand its using process.
Before using a free arm, it is necessary first to sew the whole garment.
 For instance, after stitching the whole pair of jeans, the free arm is required for stitching around the hem.
Slide away the toolbox attached to the sewing machine to expose the free arm.
Now, slide through one of the legs of the garment over the top of it.
Place the hem portion facing upwards.
While sewing around the hem, use your one hand to show the direction as the fabric passes through the feed dog.
Do not put too much force while pulling, or else the thread will start shredding.
A light pulling with hands will give the sewing motion a smooth way forward.
Slip And Sew Technique
For using a free arm to stitch two pieces of a tube of a garment, follow the steps as below:
- Step 1: first and foremost, cut two equal pieces of fabric. The size must be such that it slides through the free arm.
- Step 2: Fold each of the above pieces in halves. Face it to your right side and match the shorter sides.
- Step 3: Secure it with a pin.
- Step 4: Initiate the standard machine and not the free arm portion.
- Step 5: Start sewing the seam but leave at least 1cm as the seam allowance.
- Step 6: Next, turn out one of the right-side pieces
- Step 6: Slip this side through the tube facing the right-side-up.
- Step 7: Line the seam up in alignment of the edges of the side to sew
- Step 8: Secure it with pins all around and do not disturb the position.
- Step 9: Take out the toolbox and keep the accessories aside.
- Step 10: Expose the free arm and attach it to the machine.
- Step 11: Align the edge of the fabric on the needle plate.
- Step 12: Lower the presser foot and usually sew as any other project.
- Step 13: Pull out the inner side of the tube and such that the wrong side is facing towards you.
- Step 14: Open up the seam and press them flat.
- Step 15: Flip it to the right side, and join the two pieces.
Tips
After completing sew, use an iron and press it for an even surface.
And before you begin to use the free arm, do not forget to empty the toolbox.
While sliding the fabric through the free-arm, use your hand to provide some support to glide through smoothly. But remember not to pull or push with a great force to prevent damaging the fabric.
Application Of A Free Arm Sewing Machine
 Free arm machines find their usage in households as well as industrial purposes. As a domestic tailor, you may use it for sewing sleeves, worn-out stitches in trousers, jeans, cuffs of shirts, etc. Any material that needs to have a tube-like formation requires the utilization of the free arm. They are not necessary while straight sewing fabrics. They also find their uses in industrial sectors.
Fashion labels manufacturing jeans and trousers need heavy duty sewing machines and along with an attachment of a free arm. The industrial sewing machines are much larger and are computerized. The design needs uploading. However, a free arm is necessary for any garment that requires a hollow tube-like structure, as already mentioned above.
Where Can I Buy A Free Arm Sewing Machine?
Before you invest in a sewing machine, remember to ask for a free arm machine if you sew projects that need its features. It does not have necessarily have to be an expensive one. You may find a pocket- friendly tool in your near-by local stores. A lot of options are, of course, available online.
Many brands have their official website, where you may purchase one as per your requirement. Not all machines have a free arm attachment. Also, keep the user manual handy after purchase, as you may need it at any time. Keep your sewing machine neat and clean. Avoid accumulation of lint and dust to provide longevity.
You may not excel stitching with a sew arm in a day, but with practice, you shall surely do better. Next time onwards, you don’t have to worry while sewing a pair of trousers or the sleeves of a shirt. Just take the free arm from below the machine and glide the material through it. You will have your self-stitched outfit. Enjoy the experience of sewing.


